The Chef's Kitchen: three heat sources, one work surface
Verdict first: if you want an outdoor room that actually replaces your indoor kitchen, do not build it around a single grill. The plan calls for three heat sources — a built-in gas grill as primary heat for everyday high-capacity cooking and searing, a wood-fired pizza oven for high-heat specialty work, and a built-in smoker for low-and-slow, long-duration temperature control — all served by a single chef's island measuring 12 feet by 4 feet.
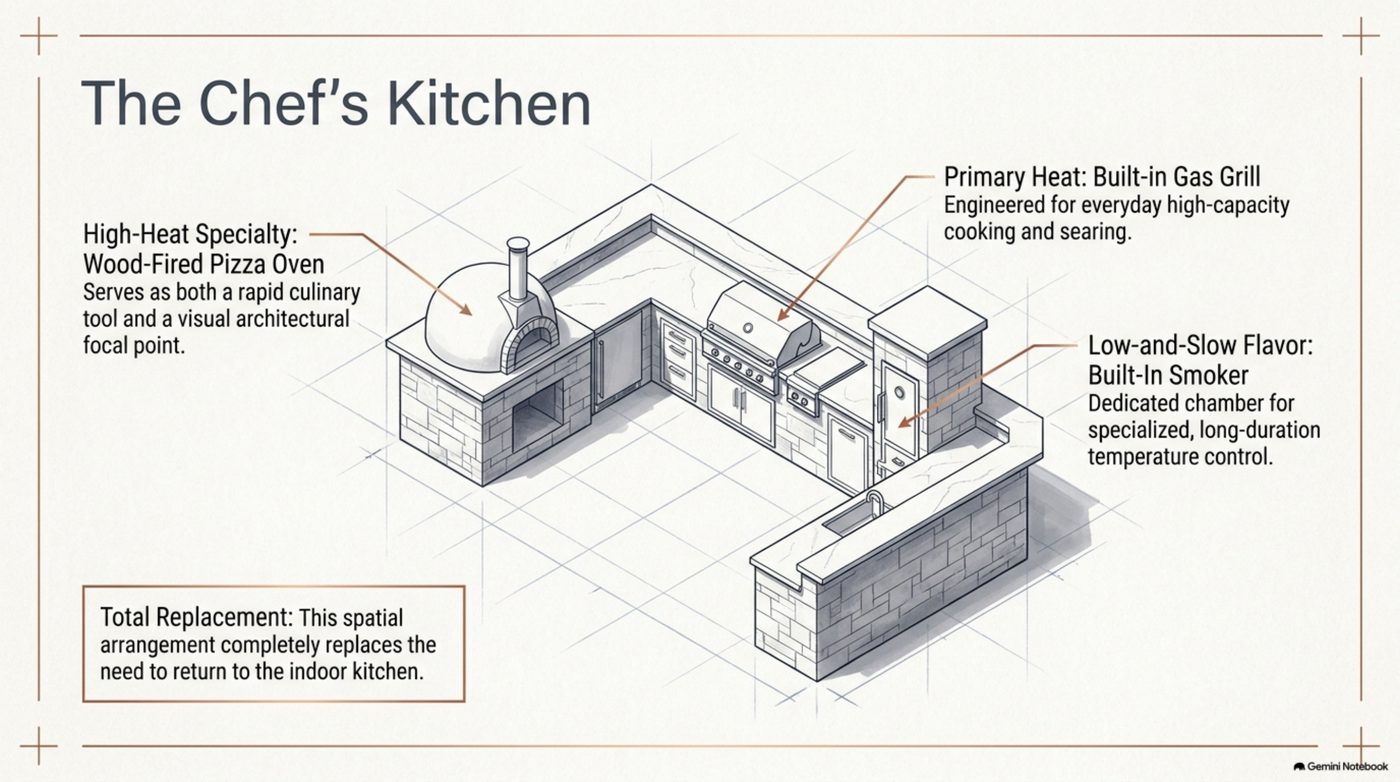
One grill is an amenity. Three heat sources feeding one 12-by-4 island is a kitchen. That is the difference between a room you use twice a week and a room that carries the holiday meal.
The plan itself calls the arrangement a total replacement: it is designed so you do not return to the indoor kitchen mid-service. The right test is blunt. If a guest shows up with something that needs a different heat profile, does the outdoor room have an answer? On this plan it does.
This article expands one section of the Outdoor Architectural Master Plan. If you want the whole schematic in one pass, read the master plan walkthrough first, then come back to the cooking core.
What each heat source is actually for
The plan splits the cooking load deliberately instead of asking one appliance to do everything. Three jobs, three tools, three different sets of clearances.
| Heat role | Appliance on the plan | Job it exists to do | What the build must allow for |
|---|---|---|---|
| Primary heat | Built-in gas grill | Everyday high-capacity cooking and searing | A gas run, ventilation clearance, and staging space beside the lid |
| High-heat specialty | Wood-fired pizza oven | A rapid cooking tool and a visual architectural focal point | A dedicated footprint, masonry mass, and clearance to combustibles |
| Low and slow | Built-in smoker | A dedicated chamber for specialized, long-duration temperature control | A fuel path and room to tend it without blocking the island |
| Cold storage | Built-in refrigerator | Keeps service inside the outdoor room | A framed cabinet height and power at the point of use |
| Work surface | Chef's island, 12 ft x 4 ft | The staging area all three heat sources feed | A counter long enough to hold the load without crowding prep |
Read that table as a construction brief rather than a shopping list. The grill, the oven, and the smoker are not three purchases. They are three footprints, three fuel paths, and three clearance sets that have to be resolved before anything is framed.
Why the 12-by-4 island is the load-bearing decision
The plan gives the island 12 feet of length for a reason. Three heat sources plus landing space do not fit on a 6-foot run. When the grill takes its section, the oven takes its own, and the smoker takes a third, what is left between them is the staging area that makes the room workable at speed.
The 4-foot depth is the other half of the spec. It keeps the cook within arm's reach of the working edge and — paired with the height step described below — puts a raised bar between the work zone and company.
Two decisions have to be made at the island: how much of the 12 feet goes to the grill, and whether the smoker lives in the island or on its own run. Either answer works. What does not work is deciding after the framing goes up, because the framing carries the gas, the power, and the venting.
Workflow and sightlines: where the island sits
The plan positions the chef's kitchen as the anchor of the workflow, and it places a 6-foot linear fire feature at the lounge boundary. That is a deliberate split: cooking heat on one side, sitting heat on the other, with the seating arranged so the two do not compete.
It also puts the social boundary on a raised bar. A standard counter sits at 36 inches and is a work surface. A raised bar at 42 inches is a lean-and-talk surface that hides the messy prep side while keeping eye contact between cook and guests. In an Austin summer, with so many 100-plus degree days pushing entertaining to dusk, that height step is what lets one person cook and host at the same time.
If you are still choosing between layouts, the Outdoor Kitchen Design Guide for Austin Homes covers the layer beneath this one.
Sequencing the build so the appliances fit
The order that avoids rework is short. Settle the three heat sources and the cold storage before the island is framed. Settle the island before the counter is templated. Settle the counter before the bar height is fixed. Each step closes off the one after it, so the decisions have to run in that direction.
Two free tools help you hold the numbers while you compare bids. The outdoor kitchen cost calculator turns the appliance list into a budget range, and the decision funnel helps you pick between package layouts. Both live in the tools hub.
If you would rather hand the plan to someone who prices these builds every week, you can get free estimates and match with up to 3 pre-vetted Austin pros within one business day.
Frequently asked questions
Do all three heat sources have to go in at once?
No, and most builds do not. The grill is the one to install first because it carries the everyday load. What you cannot defer is the island length: set the full 12-foot-by-4-foot surface now so the smoker has a home when you add it. Adding an appliance to an island designed for three is straightforward. Rebuilding an island designed for one is not.
How much landing space does a 12-foot island actually give me?
Treat the 12 feet as a three-part working envelope: grill, oven, smoker. Reserve uninterrupted counter between the grill and the prep zone, and keep the oven off-center so it reads as architecture without eating the staging area. The staging counter is the part homeowners regret trimming first.
What has to be decided before the framing goes up?
Four things: fuel (gas for the grill, wood for the oven and smoker), power at each appliance location, clearance to combustibles for the oven and smoker, and the height step from the 36-inch counter to the 42-inch bar. Get those four right on paper and the framing simply follows them.